Acrobat supports viewing, printing, and annotating of PDF files. The commercial proprietary Acrobat, available for Microsoft Windows and macOS only, can also create, edit, convert, digitally sign, encrypt, export, and publish PDF files.
We hope these tips help you in your management of PDF files!
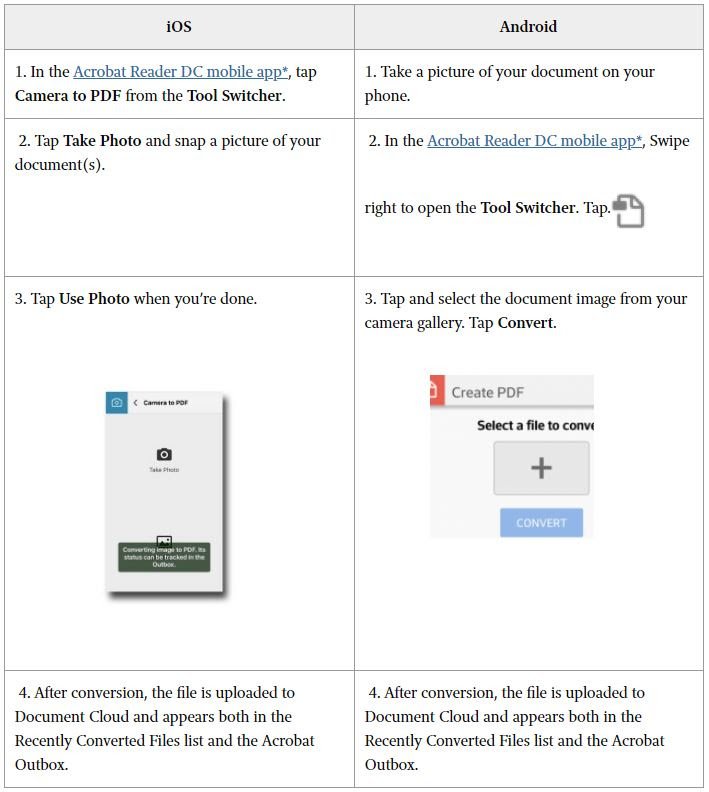
5. In the desktop version of Acrobat DC, select Document Cloud from the Storage location on the Home screen, and open the PDF of your camera image.
6. Select Enhance Scans from the right-hand pane, then select Camera Image from the Enhance dropdown.
7. Adjust the page border and select Enhance Page.
8. Click the X in the upper-right corner to close Enhance Scans.
9. Click Edit PDF in the right-hand pane to automatically run text recognition and edit the document.
Easily Fill Out Non-Interactive PDF Forms
The Fill & Sign tool allows you to complete non-interactive forms in Adobe Acrobat DC, Reader DC, a web browser, or even mobile devices. Here’s how to use it in Acrobat or Reader on the desktop:
1. Open your form and select Fill & Sign from the right-hand pane.
2. Select the Add Text tool in the toolbar to fill out text areas. Click the I-beam cursor where you want to insert text and begin typing.
3. Use the Add X or Add checkmark tools to complete checkboxes on your form.
4. Use the Pen tool to add your signature to the form. You can type, draw, or use an image for your signature.
We hope that you found these first couple of Acrobat tips useful!
Make sure to stay tuned for more Adobe tips and tricks! If there is anything else that we can assist you with please do not hesitate to reach out to us at Vintage IT Services.


